
Homemade Chocolate Ice Cream with Machine
Introduction
If you’re a true chocolate lover, this treat is just for you!
Around the world, people love to enjoy a sweet dessert after a good meal, and ice cream quickly becomes a daily must-have when the weather heats up. Homemade Chocolate Ice Cream with Machine.
Now, imagine having an ice cream machine right in your kitchen. Within minutes, you can make delicious, creamy ice cream. That sounds tempting. So, let’s discover how to create and enjoy this mouthwatering chocolate delight right from home!
Making ice cream isn’t just about taste—it’s a truly therapeutic and joyful experience. No matter your age, it’s fun for everyone. When you make it with your hands and serve it to your family or guests, you’ll be showered with compliments, especially from the kids!
If you have already made it or are doing this for the first time, don’t worry.
Let’s explore how to create this delightful chocolate ice cream in your kitchen.
Why Make Chocolate Ice Cream at Home?
Chocolate ice cream is already a delicious treat loved by both kids and adults. But there’s something extra special about making it yourself at home. When you create something tasty with your hands, the joy and satisfaction increase; you can customize it with your favorite ingredients, making it even more enjoyable.
When we buy ice cream from the store, we often spend a lot, but the taste may not be great. That’s because it’s a business—they try to cut costs and maximize profit. But when you make it at home, you can use generous amounts of high-quality ingredients without holding back.
The process of making chocolate ice cream is also a lot of fun! Once you try it, you’ll see. Like how we enjoy baking cakes at home with everyone involved, making ice cream brings joy and enthusiasm for everybody in the group.
Above all, store-bought ice creams frequently include harmful amounts of sugar, preservatives, and artificial flavors.
When prepared at home, it is healthier, purer, and much tastier because you know exactly what you’re putting in.
Here are more reasons to make it at home:
Use of pure ingredients: When you make it yourself, you know exactly what’s going in — no harmful additives, just honest, good-quality ingredients.
Customized to your taste: Want it extra chocolatey, less sweet, super creamy, or packed with nuts, cookies, or chocolate chips? You can make it just how you like.
Fun time with family: Making ice cream can be a joyful activity for the whole family to enjoy together. Saves money: After a few batches, you’ll notice it’s more budget-friendly than constantly buying expensive brands.
Joy of making it yourself: There’s a unique satisfaction in eating something made with your hands — and it’s always better tasting!
Thus, take a minute to prepare your chocolate ice cream and check its effectiveness. In addition to creating a delicious dessert, you’ll make some delightful memories! Choosing an Adequate Ice Cream Maker The proper machine is essential because we will utilize one to manufacture ice cream.
Three common machine kinds to think about are listed below:
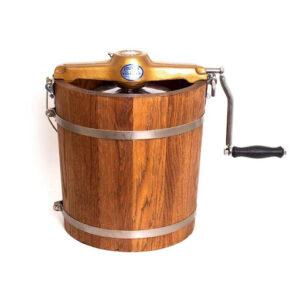
- Manual (Hand-Cranked): Some individuals enjoy and find nostalgia in this antiquated technique. However, churning the ice cream by hand requires more time and physical work.

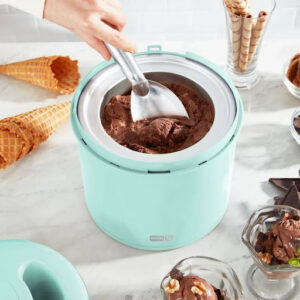
- Electric with Freezer Bowl: This is a reasonably priced choice. This kind requires the bowl to be frozen 12 to 24 hours before. After that is finished, it is simple to use and an excellent option for making homemade ice cream.
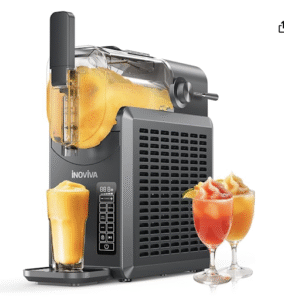
- Compressor (Self-Freezing): This is the easiest and most professional type of ice cream machine. It doesn’t require pre-freezing — the machine cools and churns the mixture.
It’s ideal for those who plan to make ice cream frequently or want a restaurant-style result.
Although it’s more expensive, it’s a long-term investment. It saves time and gives consistently excellent results.
If you plan to buy one machine for the long run, investing in a good-quality compressor model is worth it.
How to Operate a Freezer Bowl Electric Ice Cream Machine:
One of the most well-liked and reasonably priced models for producing ice cream at home is the “Electric with Freezer Bowl” type. Although it is simple to operate, the bowl must be fully frozen before use.
A thorough approach
A detailed approach to successfully utilizing this model may be found below:
- Place the bowl in the freezer for at least 12 to 24 hours before making ice cream. To check if the dish is ready, shake it; if there are no sounds of liquid splashing inside, it is frozen.
Tip:
- .If you make ice cream frequently, keep the bowl in the freezer so it’s always ready.
- Prepare and Chill the Ice Cream Mixture Follow your chosen recipe to make the chocolate or other flavored base. Place the mixture in the refrigerator for 4–6 hours to chill thoroughly.
Cold mixture churns better and produces smoother, creamier, store-quality ice cream.
- Set Up the Machine Take the frozen bowl out of the freezer and immediately place it into the machine (don’t leave it too long). Attach the paddle and lid, then turn the machine on.
- Pour in the Mixture & Start Churning Slowly add the cold mixture while the machine is operating. After churning for 20 to 30 minutes, the mixture will usually get to the consistency of soft serve.
5. Add Mix-ins (Optional) When the ice cream is almost ready (last 5 minutes), add any extras like: Chocolate chips, nuts, cookie pieces, etc.
6. Keep it in the freezer until it sets completely. After the ice cream is done, it should be stored in an airtight container. Wrap it with plastic so that ice doesn’t form. Freeze for at least 4 hours or overnight to let the ice cream fully set.
Some Important Tips:
Never keep the bowl at room temperature or warm — it will lose its freezing power.
Always turn the machine on before pouring the mixture — otherwise, it may freeze at the bottom.
Don’t overload with too much mixture — As it churns, it needs more space.
How to Use a Compressor (Self-Freezing) Ice Cream Machine:
The Compressor or Self-Freezing model is the most modern and professional-grade type of ice cream maker.
Its most significant advantage is that it chills the mixture while churning, so there’s no need to pre-freeze the bowl. This means you can enjoy fresh ice cream anytime without waiting!
This machine is straightforward to use and saves time. Here’s a step-by-step guide:
- Turn On the Machine First, power on the machine to let it start cooling. Most compressor models have a pre-cool function — you can activate this to slightly chill the chamber before adding the mixture.
- Prepare & Chill the Ice Cream Mixture Make your ice cream base (chocolate, vanilla, or any flavor) following your chosen recipe. Optionally, chill the mixture in the refrigerator for about 4 hours — this step is not mandatory but improves the texture and flavor.
- Pour the Mixture & Start Churning Slowly pour the cold or room-temperature mixture into the machine’s bowl. Attach the paddle and lid securely. Press the “Start” or “Churn” button. The machine will automatically chill the mixture while churning it into smooth ice cream. Churning typically takes 30–45 minutes, depending on the model.
- Add Mix-ins (Optional) When the ice cream is nearly done (last 5 minutes), add any mix-ins like: Chocolate chips, nuts, cookie chunks, etc. You can also gently fold them in by hand after churning.
- For a firmer texture, move and freeze When the ice cream is sufficiently soft to serve, turn off the machine. If desired, immediately serve it as soft serve, or freeze it for at least 4 hours (or longer) to allow it to set fully.
Important Advice:

After using the machine, ensure it is spotless by removing and washing the paddle, bowl, and lid.
Do not overfill; doing so may hinder adequate freezing and churning of the mixture.
Give the machine a break between batches to avoid overheating, mainly while producing several batches consecutively.
Making Chocolate Ice Cream at Home:
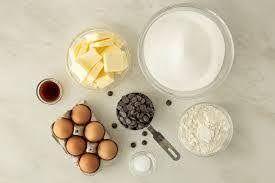
 Required Ingredients:
2 1/2 cups heavy cream (600ml)
1 can condensed milk (400g)
1 /4 cup cacao powder (60ml)
100g /3.5 oz. dark chocolate, melted
Chocolate chips (for topping or mixing)
Optional Mix-ins:
Chocolate chunks
Fudge, caramel, or peanut butter swirl
Crushed cookies or nuts
Step-by-Step Instructions:
Whip the cream
After taking the cream in a large bowl, use a handheld beater to beat it until gentle peaks emerge.
Prepare the chocolate mixture:
Mix the cocoa powder, condensed milk, and melted chocolate well in a clean bowl.
Combine mixtures:
Gently combine the whipped cream with the chocolate mixture. Mix slowly to keep the texture light and airy.
Add chocolate chips (optional):
Stir in chocolate chips if desired or save them to sprinkle on top.
Transfer to the container:
Pour the mixture into an airtight container.
Freeze:
Place in the freezer for 6 to 10 hours or overnight, until the ice cream is fully set.
Serve:
To make scooping the ice cream easier, before serving, allow it to remain at room temperature for five to ten minutes.
Freeze for 4 hours or more until fully set.
Tips for Better Results:
Use high-quality chocolate – it’s essential for rich flavor.
Chill the mixture thoroughly for a smooth, creamy texture.
Avoid over-churning – it can make the ice cream grainy.
Add mix-ins at the end – so they don’t sink to the bottom.
To avoid freezer, burn, store food correctly in an airtight container.
Flavor Variations
Mexican Chocolate:
Add a little cinnamon and a pinch of chili powder.
Mocha:
Mix 1 tablespoon of instant espresso powder with the cocoa.
Mint Chocolate: Add peppermint extract and crushed mint candy.
Vegan:
Use coconut milk, dairy-free chocolate, and skip the eggs.
Common Mistakes & Fixes:
Icy texture: You may have used low-fat milk. Use full-fat dairy.
Eggy smell: The custard was overheated – use a thermometer next time.
Weak flavor: Add a pinch of salt or a splash of extra vanilla.
Too soft: Freeze a bit longer, but don’t over-freeze or it’ll get too complicated.
Storage & Serving
Best if consumed within 1–2 weeks.
Give the ice cream five to ten minutes to sit at room temperature before scooping.
Garnish ideas:
Chocolate shavings
Fresh berries
Whipped cream
Nuts or cookies
Ice Cream Machine Cleaning Tips:
Now that we’ve learned about ice cream machines and even made some ice cream, it wouldn’t feel complete if we didn’t talk about cleaning. So, let’s find out how to clean your machine correctly.
After Each Use
Unplug the machine before cleaning it.
Remove all the parts that come with the machine.
Take off the lid and the freezer bowl (if there is one)
Wash all removable parts:
Clean with mild soap and warm water.
Rinse thoroughly with clean water.
Let air dry or wipe with a clean towel.
Clean the exterior of the machine.
Wipe with a damp cloth.
Never immerse the motor or base unit in water.
Weekly or Deep Cleaning (If Used Frequently)
To remove smells or stains, soak detachable parts in a vinegar and water solution (1:3) for 10 to 15 minutes.
Use a soft brush. Corners and tight areas.
Pay special attention to the mixing shaft and areas where cream or sugar may collect.
What to Avoid
Steel wool and hard scrubbers might scrape the surface, so avoid using them.
Avoid bleach or harsh chemicals.
Not all parts are dishwasher-safe—check the user manual first.
Extra Tip:
Let all parts dry completely before storing—otherwise, mold or foul odor may develop.
Frequently Asked Questions
Q: How long can homemade ice cream be stored in the freezer?
A: It’s best to consume it within 1–2 weeks. Keeping it frozen for too long is not ideal for health or taste.
Q: Can I make it using only cocoa powder?
A: Yes, you can. However, using cocoa powder and melted chocolate makes the flavor richer. Chocolate plays a significant role in enhancing the taste of chocolate ice cream.
Q: Is it safe to use eggs in the recipe?
A: Yes. This recipe involves cooking the custard, so the eggs are safe to eat.
Q: What type of chocolate is best?
A: Use semi-sweet or dark chocolate with at least 60% cocoa content.
Q: Can I use low-fat milk or alternatives?
A: Yes.
Q: Why is my ice cream grainy?
A: This can happen due to overcooking or improper churning. Make sure to follow the correct temperature and churning time.
Conclusion
Making chocolate ice cream at home isn’t just a cooking project—it’s a fun experience where you create something you love, by yourself. And the result? A delicious dessert made with your own hands.
If you have kids at home, this is a great activity to do together—it can also help them grow mentally and emotionally.
You can make the perfect ice cream with quality ingredients, the right machine, and a bit of patience.
Serve it at a party, surprise your loved ones, or treat yourself to a sweet little moment—this recipe will always bring you joy.
Now you’re ready! Make your chocolate masterpiece—
Your freezer (and your taste buds) will thank you!
Hope this blog was helpful and that you and your family feel satisfied and happy after trying it out.